
A shower niche is one of those tiny bathroom details that can either look beautifully intentional or strangely unfinished. That is why shower niche trim matters so much: it frames the storage opening, protects exposed tile edges, and gives the whole shower a cleaner, more professional finish.
The tricky part is that trim is not just about style. In a wet shower, every edge, shelf, corner, and transition has to work with the waterproofing system underneath. Tile may shed water on the surface, but tile alone is not the waterproof layer; CTEF explains that wet areas need a positive water barrier behind the tile to stop water from entering the building structure.
A polished niche can make a shower feel custom, even if the bathroom is modest. However, a poorly planned niche can collect water, show chipped tile edges, fight the wall layout, or look like it was squeezed in at the last minute.
This guide walks through trim styles, materials, waterproofing concerns, layout planning, installation details, costs, and common mistakes so you can make a decision that looks good now and still performs years from now.
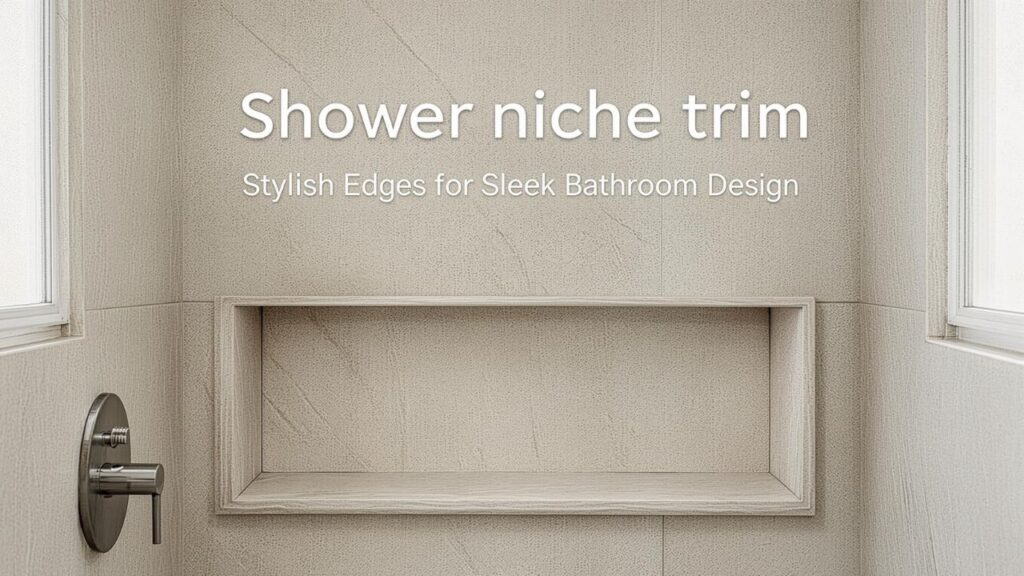
Table of Contents
- What shower niche trim Does
- Why Trim Matters in a Wet Shower
- Best Trim Styles and Edge Options
- How to Choose shower niche trim
- Waterproofing, Slope, and Tile Layout
- Materials, Finishes, and Design Pairings
- How to Install shower niche trim the Right Way
- Cost, Value, and Professional Insights
- Common Mistakes to Avoid
- Real-Life Shower Niche Design Examples
- FAQ
- Conclusion
What shower niche trim Does
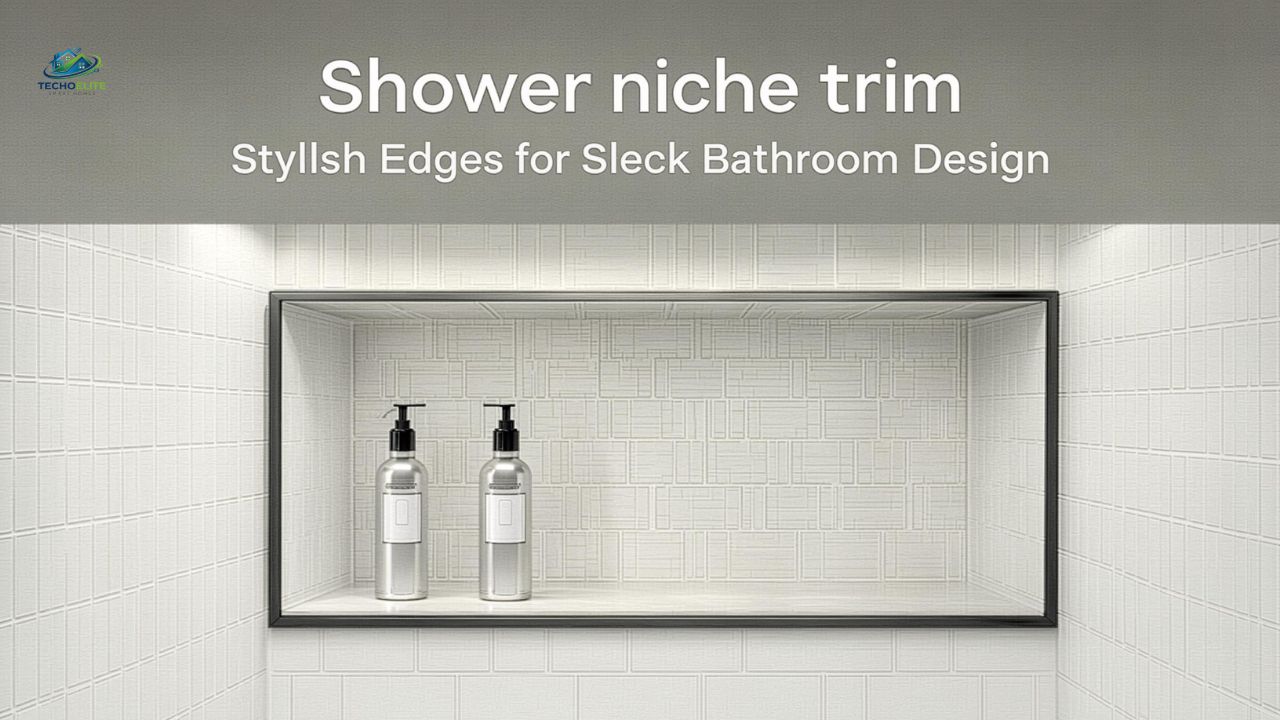
Shower niche trim is the finishing edge used around the outside corners or exposed tile edges of a recessed shower storage niche. It can be metal, tile, stone, PVC, bullnose tile, pencil liner, quarter round, mitered tile, or another finishing profile designed to protect and define the niche opening.
A good shower niche trim choice does three jobs. First, it protects the edge of the tile from chipping. Second, it hides raw cuts and creates a clean transition between the niche and surrounding wall tile. Third, it shapes the design personality of the bathroom.
Schluter’s profile literature explains that exposed tile edges can be brittle and may crack or chip if left unprotected, which is why finishing and edge-protection profiles are used at outside and inside corners, walls, floors, and niches.
In simple terms, trim is like the frame around a picture. The tile may be the artwork, but the frame controls whether the finished result feels sharp, soft, modern, traditional, subtle, or decorative.
Trim versus waterproofing
This point is worth saying clearly: trim is not waterproofing. Trim finishes the edge. Waterproofing protects the wall system. A beautiful trim choice cannot make up for missing membrane, poor slope, bad corners, or incompatible materials.
TCNA’s shower guidance says the waterproof membrane must cover the solid backing under the entire tiled area, and it emphasizes that membrane and backing-board compatibility should follow manufacturer recommendations.
That is why niche planning should happen before tile installation begins, not after the installer has already cut a hole and started guessing at edges.
Why Trim Matters in a Wet Shower
A shower niche lives in one of the hardest-working parts of a bathroom. It holds shampoo bottles, gets sprayed with water, collects soap residue, and is often touched daily. Even if it looks like a small design feature, it has to perform like part of the shower assembly.
The niche has more corners than a flat wall, and corners are where sloppy work becomes obvious. A raw tile edge, uneven grout joint, mismatched trim finish, or shelf that does not slope can ruin the look of an otherwise lovely shower.
CTEF notes that all surfaces in a wet area, including niches and shelves, should slope toward the drain so water can evacuate rather than sit in place. It also recommends selecting an appropriate waterproof membrane and following manufacturer instructions completely.
From a design perspective, trim matters because the eye naturally lands on the niche. It is usually at chest height, surrounded by tile, and often placed on the most visible shower wall. If the edge is clean, the shower feels intentional. If the edge is messy, people notice even if they cannot explain why.
Practical benefits
- Covers exposed tile cuts
- Reduces the chance of edge chipping
- Creates a cleaner transition at outside corners
- Helps the niche look aligned with the overall tile layout
- Adds contrast, softness, or a minimalist finish
- Can coordinate with faucets, drains, shower doors, and hardware
- Makes a simple tile job look more custom
The best trim choice is the one that supports both the tile and the room. It should not feel like an afterthought grabbed from the aisle at the last second.
Best shower niche trim Styles and Edge Options
There is no single “best” trim for every shower. The right choice depends on tile thickness, bathroom style, installer skill, budget, maintenance expectations, and whether you want the niche to stand out or disappear.
Metal edge profiles
Metal profiles are one of the most common modern choices. They come in finishes such as brushed nickel, chrome, matte black, brass, bronze, stainless steel, white, and textured colors. Profiles may be square, rounded, slim, decorative, or minimalist.
They work especially well with porcelain tile, large-format tile, contemporary bathrooms, and niches where the tile edge would otherwise look unfinished. Schluter’s examples show profiles such as QUADEC, JOLLY, and RONDEC being used to frame shower niches and protect tile edges.
Metal trim can look crisp and architectural, but it needs careful cutting. Mitered corners should meet cleanly, and the finish should coordinate with other visible metals in the bathroom.
Bullnose tile
Bullnose tile has one or more rounded finished edges. It is a classic choice for traditional bathrooms, subway tile showers, and designs where you want the niche edge to feel soft rather than sharply framed.
The challenge is availability. Not every tile collection includes bullnose pieces. If the matching bullnose is unavailable or expensive, a metal profile or mitered edge may be more practical.
Mitered tile edges
A mitered edge is created by cutting tile edges at an angle so two pieces meet cleanly at the corner. This can look seamless and high-end, especially with stone-look porcelain, large-format tile, or slab-style designs.
However, miters require skill. Thin, fragile, or heavily textured tiles can chip during cutting. Sharp mitered corners can also be vulnerable in a niche that gets bumped by bottles or razors.
Pencil liner or decorative trim
Pencil liners, chair rails, and decorative trim pieces add a more traditional or detailed look. They can frame the niche like a small architectural feature.
This works well in classic bathrooms, vintage-inspired spaces, and showers with accent tile. The downside is that decorative profiles can collect more soap residue and may look busy if the wall tile already has a strong pattern.
Stone slab trim
Stone or engineered stone can be used for the niche sill, shelf, or frame. A solid piece on the bottom shelf is especially helpful because it reduces grout joints where water and residue collect.
Marble, quartz, granite, and porcelain slab pieces can all create a refined look. Just remember that natural stone may need sealing and more careful cleaning than porcelain.
Tileable prefabricated niches
Some prefabricated niches are designed to be tiled directly and integrated into a waterproofing system. Schluter notes that prefabricated KERDI-BOARD niches are fully waterproofed and include a waterproofing collar for wall connection, while other niche products are designed for direct integration with compatible waterproofing systems.
These can save time and reduce layout guesswork, but they still need proper installation, correct trim decisions, and careful tile planning.
How to Choose shower niche trim
Choosing shower niche trim becomes easier when you stop looking at the niche alone. Look at the entire bathroom: tile color, grout color, plumbing finish, glass door hardware, vanity hardware, lighting, and overall style.
Your shower niche trim should either blend quietly or make a deliberate design statement. Problems happen when it does neither. A random chrome profile in a bathroom full of warm brass can feel accidental. A thick decorative trim around a minimalist tile wall can feel heavy.
Start with the tile thickness
Tile profiles come in different depths. The profile should match the tile thickness closely so the finished edge sits flush and clean. If the trim is too shallow, tile edges may sit proud. If it is too deep, the profile may look bulky or leave awkward transitions.
Decide whether the niche should blend or pop
A blended niche uses trim close to the tile or grout color. It feels quiet and clean. A contrast niche uses black, brass, chrome, or another finish to outline the shape. It becomes more graphic.
For small bathrooms, a blended look can feel calmer. For bold modern showers, contrast can be beautiful.
Coordinate with fixtures carefully
You do not always need an exact metal match, but the finishes should make sense together. Brushed nickel trim with brushed nickel fixtures is safe. Matte black trim with black shower hardware looks crisp. Brass trim can be gorgeous, but the tone of brass matters because some finishes are warm gold while others are muted or antique.
Think about maintenance
Rounded profiles are sometimes easier to wipe than highly detailed trim. Stone shelves may need sealing. Black trim can show soap residue in hard-water areas. Chrome can show water spots. White profiles can blend beautifully but may show grime if cleaning is neglected.
Match the mood of the bathroom
| Bathroom style | Trim direction | Why it works |
|---|---|---|
| Modern minimalist | Slim square metal profile | Clean lines and low visual noise |
| Classic subway tile | Bullnose or pencil liner | Soft, familiar, timeless look |
| Luxury spa | Stone sill or mitered porcelain | Seamless and elevated |
| Industrial | Matte black or stainless profile | Strong contrast and structure |
| Warm transitional | Brushed nickel or soft brass | Polished without feeling cold |
| Small bathroom | Matching profile or subtle bullnose | Keeps the wall from looking busy |
| A niche is small, but the trim can shift the personality of the entire shower wall. |
Waterproofing, Slope, and Tile Layout
A niche is basically a small shelf recessed into a wet wall, so waterproofing and slope matter more than many homeowners realize. Water will land inside it every day. Some will run down the wall. Some will sit under bottles. Some will creep into corners if the installation is weak.
CTEF describes shower walls and other frequently wet tile surfaces as wet-area installations and explains that a waterproof membrane helps separate water from the substrate. It also warns against mixing products or methods from different manufacturers because that can lead to failures not covered by warranties.
The bottom shelf needs slope
The bottom of the niche should slope slightly toward the shower drain. It should not look dramatically tilted, but it should not be perfectly flat either. A flat shelf invites standing water, soap film, mildew, and staining.
Layout should begin before framing
The most elegant niches line up with tile courses. That means the niche size and placement should be planned around the tile layout, not randomly cut into the wall after tile starts.
Schluter’s niche planning guidance recommends checking structural requirements, wall thickness, pipes, and electrical installations before deciding the exact niche position and dimensions.
Bigger is not always better
A wide horizontal niche can look sleek, but it may interrupt studs, require more framing, and need careful waterproofing. A vertical niche can fit between studs more easily and provide shelves for multiple bottles.
The right size depends on what you use daily. A niche that holds one tiny soap bottle may be frustrating. A niche so large it dominates the wall may feel awkward.
Movement joints still matter
Tile expands, contracts, and responds to moisture, heat, and building movement. CTEF emphasizes the importance of movement joints in wet installations and references TCNA EJ171 as the method that addresses their placement and details.
That does not mean every homeowner has to design joints personally. It does mean a qualified installer should understand where rigid grout is inappropriate and where flexible sealant or movement accommodation is needed.
Materials, Finishes, and Design Pairings
Trim materials should be chosen for wet-area durability, visual compatibility, and the tile itself. Not every material behaves the same way in a shower.
Aluminum profiles
Aluminum profiles are common, affordable, and available in many finishes. Anodized or coated aluminum can create a sleek edge without overwhelming the tile.
They are excellent for contemporary bathrooms, but they should be installed with care so the finish is not scratched during cutting or grouting.
Stainless steel profiles
Stainless steel is durable and often chosen for higher-end or commercial-style installations. It can be a good choice in wet environments, especially when the look is crisp and modern.
It usually costs more than basic aluminum but can feel more substantial.
PVC trim
PVC trim is budget-friendly and available in simple colors like white. It can work in casual bathrooms, rentals, or low-cost renovations.
However, it may not give the same premium finish as metal, stone, or bullnose tile.
Ceramic or porcelain trim pieces
Matching ceramic or porcelain trim can create a softer, more traditional edge. If the tile collection includes bullnose or quarter-round pieces, this can be a natural choice.
The limitation is availability. Many modern porcelain tiles are sold without matching trim, which is why metal profiles have become so popular.
Natural stone
Stone trim and shelves bring a custom look, especially with marble, quartzite, granite, or limestone. Stone can be beautiful, but it needs thoughtful maintenance. Some stones are sensitive to acidic cleaners and may stain or etch.
Finish pairing ideas
| Tile style | Trim pairing | Design effect |
|---|---|---|
| White subway tile | White bullnose or chrome profile | Classic and clean |
| Large-format gray porcelain | Brushed stainless or matte black | Modern and structured |
| Marble-look tile | Polished chrome or stone sill | Elegant and bright |
| Handmade zellige-style tile | Minimal brass or mitered edge | Warm and artisanal |
| Dark shower tile | Black, bronze, or matching trim | Moody and cohesive |
| Textured stone-look tile | Square metal profile | Clean edge against rough texture |
| The safest approach is to bring actual samples together: tile, grout, trim, faucet finish, and vanity hardware. Bathroom lighting can change everything. |
How to Install shower niche trim the Right Way
Installing shower niche trim requires patience because small errors are easy to see. The corners are close together, the grout lines frame the work, and the niche often sits at eye level.
Plan the niche location
Before tile begins, decide where the niche will sit. Avoid exterior walls in cold climates unless the assembly is designed correctly. Check for plumbing, electrical, studs, and wall thickness.
Confirm waterproofing compatibility
Use one waterproofing system and follow its instructions. TCNA notes that the design professional or specifier should select suitable membrane and backing-board combinations, while CTEF stresses following manufacturer instructions without deviation.
Dry-fit everything
Before setting trim permanently, dry-fit the tile pieces, trim profiles, shelves, and corner cuts. Check that the trim depth matches the tile thickness and that mitered corners close neatly.
Set the bottom piece with slope
The shelf or sill should pitch toward the drain. This is easy to miss, but it makes daily use much cleaner.
Keep corners clean
Trim corners should meet cleanly. Metal profiles often need careful miter cuts or matching corner accessories. Bullnose pieces should align with grout joints. Stone shelves should be cut square and polished where visible.
Use the right mortar and sealant
CTEF notes that mortar used in wet areas should be suitable for the condition and that manufacturer guidance matters, especially with membranes and impervious substrates.
Clean as you go
Dried thinset, grout haze, and sealant smears are harder to remove later. A neat installer protects the trim finish during the work rather than trying to rescue it afterward.
Cost, Value, and Professional Insights
There is no personal background or net worth angle for this topic because it is a bathroom remodeling detail, not a public individual. The useful financial question is where trim fits into the cost and value of a shower project.
Trim itself may be a small line item compared with tile, waterproofing, labor, plumbing, glass, and fixtures. However, its visual impact is large because it outlines one of the most noticeable parts of the shower.
Typical cost factors
- Trim material and finish
- Number of niche edges
- Mitered versus straight cuts
- Tile thickness and complexity
- Whether the niche is prefabricated or site-built
- Stone shelf or slab work
- Installer skill level
- Waterproofing system compatibility
- Number of shelves inside the niche
A basic PVC or aluminum profile is usually less expensive than stainless steel, stone, or custom mitered tile. A site-built niche with multiple shelves and detailed trim takes more labor than a simple prefabricated niche.
When to hire a professional
A confident DIYer may be able to handle a simple backsplash niche or dry-area wall recess. A shower niche is different because it lives in a wet area. If you are unsure about waterproofing, slope, substrate, or tile layout, hire a qualified tile professional.
CTEF says its Certified Tile Installer program is a third-party assessment of installer skills and knowledge recognized by the tile industry, and it frames certification as a way for homeowners to gain peace of mind about proper installation.
The cheapest quote is not always the best value. If one installer carefully plans waterproofing, slope, layout, and trim while another simply says “we’ll make it work,” choose the person who explains the process.
Common Mistakes to Avoid
The first mistake is choosing trim after the tile is already installed. By then, the niche size, tile cuts, and profile depth may limit your options.
The second mistake is assuming grout makes the niche waterproof. It does not. Waterproofing belongs behind the tile, and the system must be continuous through corners and changes of plane.
The third mistake is using a flat shelf. A niche shelf that does not slope toward the drain will collect water and soap residue. CTEF specifically notes that niches and shelves in wet areas should slope to the drain.
The fourth mistake is mismatching metals. Chrome trim, brushed brass fixtures, black door hardware, and nickel accessories can all fight each other if there is no plan. Mixed metals can work, but they should look intentional.
The fifth mistake is picking trim that is the wrong depth. Even a beautiful profile looks amateur if the tile sits too high or too low against it.
The sixth mistake is placing the niche where plumbing already lives. Always check the wall before cutting. Schluter’s niche planning guidance highlights pipes and electrical installations as key considerations before finalizing position and size.
The seventh mistake is making the niche too small for real bottles. Measure the products you actually use, including pump bottles. A niche that cannot hold daily items becomes a decorative hole rather than useful storage.
The eighth mistake is overdecorating. Accent tile, pencil trim, contrasting grout, metal edge, and multiple shelves can become visually noisy. A niche should enhance the shower, not compete with every other detail.
Real-Life Shower Niche Design Examples
Imagine a small guest bathroom with white subway tile and chrome fixtures. A simple white bullnose frame around the niche can keep the look soft and classic. The niche does not shout; it simply belongs.
Now picture a modern primary shower with large-format concrete-look porcelain. A slim matte black metal profile can outline the niche and tie into the black shower valve, door hardware, and drain. The result feels crisp, graphic, and deliberate.
For a warm spa-style bathroom, a quartz or stone sill inside the niche can reduce grout lines and create a smooth shelf for bottles. Pair it with a subtle brushed nickel profile, and the niche feels polished without being flashy.
In a bathroom with handmade tile, the edges may be wavy or irregular. A mitered edge may be difficult, while a soft metal profile or handmade trim piece may respect the tile’s imperfect character better.
For a family shower, practicality may matter more than drama. A taller vertical niche with two shelves can separate adult shampoo, kids’ products, razors, and soap. In that case, trim should be durable, easy to wipe, and not too delicate.
These examples show why there is no universal answer. The best trim is the one that fits the tile, the waterproofing system, the bathroom style, and the way the shower is used every day.
FAQ
What is the best shower niche trim?
The best shower niche trim depends on your tile, style, and budget. Metal profiles are clean and modern, bullnose tile feels classic, mitered tile looks seamless, and stone shelves can add a custom feel.
Do I need trim around a shower niche?
Not always, but most niches need some kind of finished edge. Without trim, exposed tile cuts may look rough or become vulnerable to chipping unless the tile is mitered, bullnosed, or otherwise finished.
Is metal trim good for shower niches?
Yes, metal trim is a popular choice for shower niches because it protects tile edges and creates a clean frame. Choose a wet-area-appropriate profile and coordinate the finish with your fixtures.
Can I use bullnose tile instead of metal trim?
Yes. Bullnose tile is a classic option, especially with subway tile or traditional bathrooms. The main issue is availability because many modern tile collections do not include matching bullnose pieces.
Should the bottom of a shower niche slope?
Yes. The bottom shelf should slope slightly toward the shower drain so water does not sit inside the niche. This helps reduce soap residue, staining, and moisture problems.
Is trim the same as waterproofing?
No. Trim finishes and protects the visible tile edge. Waterproofing is the membrane or system behind the tile that prevents water from entering the wall assembly.
Can I add trim to an existing niche?
Sometimes, but it depends on the current tile edge, niche depth, waterproofing, and available space. Retrofitting trim can be difficult if the tile is already set, so a professional opinion is helpful.
What trim color should I choose?
Match or coordinate with your shower fixtures, grout, and tile. Chrome feels bright, brushed nickel is versatile, matte black is bold, brass is warm, and matching tile-color trim creates a quieter look.
Are prefabricated niches better than custom niches?
Prefabricated niches can simplify waterproofing and sizing when used with compatible systems. Custom niches offer more flexibility, but they require careful framing, waterproofing, slope, and trim planning.
Conclusion
A shower niche may be small, but it carries a surprising amount of design weight. It sits right where people look, stores the products used every day, and exposes some of the most delicate tile edges in the shower.
The right shower niche trim makes that little space feel intentional. It protects the tile, sharpens the layout, supports the style of the bathroom, and helps the niche look like part of the original design rather than an awkward cutout.
Start with waterproofing, slope, and layout first. Then choose the trim style that fits your tile, fixtures, maintenance habits, and budget. When those choices work together, the finished niche feels clean, durable, and quietly custom—the kind of detail that makes the whole shower look better.