The first time I smeared a glob of wet, gray mud onto a perfectly smooth sheet of drywall, my wife looked at me like I’d finally lost my mind. We’d just spent three weekends skim-coating that wall to a glass-smooth level five finish, and there I was, about to deliberately cover it in what looked like wet beach sand. That’s the paradox of roman clay. It’s a finish so ancient it predates the concept of modern interior design, yet it’s currently the most sought-after texture in high-end Los Angeles restaurants, Brooklyn brownstones, and that one impossibly cool Airbnb you saved on Instagram at 2 a.m.
I’m not a classically trained plasterer. I’m a DIY renovator who’s made every possible mistake—mixing too little material, sanding through the topcoat, and once accidentally polishing a wall to a shine so glossy I could see my own disappointed reflection. After four full home renovations and about twenty accent walls, I’ve landed on a system that works. If you’re chasing that soft, suede-like, old-world roman clay wall that looks like it’s been absorbing candlelight for a thousand years, you’re in the right spot. We’re going to walk through the chemistry, the application madness, and the brutal truth about why this finish is worth the arm pain.
What Actually Is This Stuff? The Mineral Breakdown
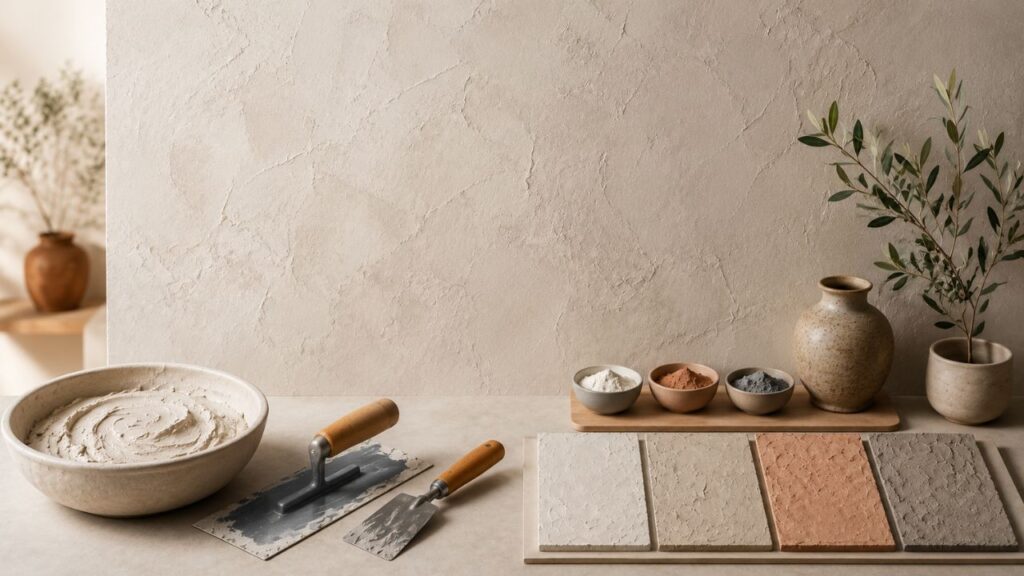
Walking into a specialty paint store and asking for what is roman clay usually gets you a vague wave toward a display wall and a brochure full of Italian villas. Let’s cut through the romance. Roman clay plaster is a water-based, natural lime and mineral-based wall coating. It’s the modern descendant of Venetian plaster and ancient Marmorino techniques, formulated to be more accessible to the modern applicator while retaining that deep, marbled stone look.
The difference between a standard latex paint and a true roman paint lies in the aggregate. When you open a bucket of a product like Portola Plaster (specifically their Roman Clay line), you aren’t seeing liquid pigment. You’re seeing a suspension of fine marble dust, limestone, and natural binders. When you trowel this onto drywall, you are physically compressing stone particles into a flat plane. Light doesn’t just bounce off the surface like it does with eggshell latex; it penetrates the microscopic peaks and valleys of the compressed marble, refracting, and then bouncing back out. This is why a roman clay wall finish seems to “glow” rather than merely shine. It’s a physical phenomenon, not a chemical gloss additive. Knowing this changes how you treat the material. You aren’t painting. You’re compressing rock.
If you find yourself gravitating toward roman clay walls, you likely hate the sterile, plastic feel of modern homes. You’re looking for depth. The material itself has a high pH (limestone is alkaline), which naturally resists mold and mildew. It breathes. That means moisture vapor can pass through it, reducing blistering and peeling in humid environments like bathrooms. This is a functional coating, not just a decorative one. When people ask me to define roman clay paint, I often correct them. Paint sits on top; clay and lime plaster integrate with the substrate, forming a calcified shell. That’s the magic behind a genuine roman clay texture.
The Toolbox and the Mindset: Preparing for the Trowel
You can’t apply roman clay with a roller. I’ve watched a desperate contractor try. It looked like a stucco ceiling from a 1970s Taco Bell. This demands a specific set of tools, most of which you’ll find in the concrete section, not the paint aisle.
Before you even open the bucket of your roman clay colors, you need a flexible stainless steel trowel. Not a big rectangular brick trowel, but a rounded Venetian plaster trowel. The rounded edges prevent edge lines—those ugly score marks left by sharp corners. A 4-inch Japanese trowel is perfect for cutting in around outlets, while a larger 10-inch rectangular steel trowel handles the broad expanses. I also keep a spray bottle of water and a clean 5-gallon bucket of water for cleaning tools immediately. Once the limestone in roman clay plaster cures on your trowel, you’re going to need a wire brush and a lot of regret to get it off.
The surface underneath matters more than you think. A roman clay wall amplifies the substrate. If your drywall has a hump, the clay’s glossy sheen will highlight it like a beacon. You need a perfectly smooth Level 4 or Level 5 finish. Prime it with a high-quality drywall primer, tinted gray or to a mid-tone of your chosen roman clay colors. This prevents white flash—those tiny pinpricks of white primer that show through if you miss a micron of coverage. I usually kill the primer with a light sanding (320 grit) to give the first coat of clay mechanical bite. Slipping on a sealed primer creates more work later.
The Physical Dance of Application
Applying how to apply roman clay isn’t complicated, but it’s physically punishing. The motion is a “cross-hatch” pattern. Scoop a generous dollop—about the size of a golf ball—onto the rounded trowel. Press it firmly into the wall at a 15- to 30-degree angle and drag it in short, random overlapping arcs. You aren’t painting a flat square. You are creating a map of islands. Leave high spots, fill low spots, and move fast.
The first coat of a roman clay application should look terrible. That’s not just okay; it’s required. If your first coat looks even, you’ve put it on too thin. The goal is to get a solid, bumpy background of mud on the substrate. You’ll see trowel marks, thick edges, and bare spots. Leave it alone. Depending on humidity, this base coat needs 2 to 4 hours to dry. Don’t rush it. If you apply the second coat over a wet base, you’ll “pull” the material right off the wall, creating craters.
The second coat is where the roman clay wall finish begins to reveal its soul. You’re going to do the same cross-hatch motion, but with less material. As the wall begins to stiffen up, you adjust your trowel angle. The sharper the angle (closer to 90 degrees), the more aggressively you scrape. As the material “flashes off” (loses its wet sheen), you start “burnishing.” This is the act of rubbing the steel blade firmly against the compressed aggregate. The friction slightly vitrifies the marble dust, creating a natural polish. If you want a truly high-end roman clay texture, you will spend an hour rubbing a wall with the flat of a trowel until your forearms scream. This pressure closes the pores of the lime and creates that suede, soft-touch finish that made you fall in love with roman plaster walls in the first place.
If you’re shooting for a specific look, the roman clay colors choice dictates the difficulty. Lighter shades (Ivory, Travertine, Limestone) are forgiving. Dark, heavily pigmented mixes (Charcoal, Navy, deep oxidized greens) are brutal. If you over-burnish a dark roman clay paint, you can create black “burn marks” where the steel literally scorches the pigment. The fix is immediate: spritz lightly with water and re-burnish to homogenize the color. Dark walls also show every pinhole left by a stray piece of aggregate. I spend twenty minutes with a headlamp and a small razor blade picking tiny rocks out of dark walls between coats.
Sealing the Stone: The Final Shield
A raw roman clay wall is functional, but it’s porous. Water splashes will leave marks, and oils from skin will darken the surface over time (a natural patina, but one that might terrify an unprepared homeowner). Most manufacturers, including Portola Plaster, sell a specific mineral sealer. This isn’t a film-forming polyurethane. You don’t want a plastic shell over your rock; that ruins the breathability and the thermal coolness of the roman clay plaster.
Instead, you apply a penetrating water-based sealer. The technique is a “flood and wipe.” You use a pump sprayer to absolutely drench the wall until it can’t absorb any more liquid, then you aggressively wipe the excess off with a lint-free rag before it dries sticky. If you leave excess sealer on the surface, it cures into a glossy, uneven resin patch that requires mineral spirits to remove, which may also strip the color of your roman clay wall finish. A properly sealed roman clay walls installation can handle bathroom steam, kitchen grease splatters, and the occasional splash of red wine without a stain. Without that sealant, you’re one orange juice spill away from a permanent abstract art piece.
Roman Clay vs. The World: A Texture Comparison
| Feature | Roman Clay / Venetian Plaster | Lime Wash | Standard Latex Paint | Microcement |
|---|---|---|---|---|
| Visual Depth | Extreme movement, marble-like, clouding effect. | Chalky, mottled, suede-like but flatter. | Flat/Plastic, no movement. | Industrial, uniform mineral look. |
| DIY Difficulty | High. Requires trowel skill and burnishing. | Medium. Brush application, forgiving. | Low. Roller and brush. | Very High. Requires grinding/sanding. |
| Feel | Cool, dense, polished stone. | Powdery, dry. | Smooth, plastic-like. | Hard, concrete-like. |
| Water Resistance | Good (once sealed). | Poor (unless sealed). | Excellent. | Excellent. |
| Repairability | Seamless patches possible. | Difficult to match mottling. | Obvious flashing on touch-ups. | Difficult to match aggregate. |
Case Study: The Kitchen That Couldn’t Be Tiled
I want to give you a specific scenario because that’s how we actually learn. A client of mine (a mid-century enthusiast in Austin) had a massive, 14-foot range hood that was drywall. Tiling it would have looked like a bathroom shower. Paint felt cheap. We applied a custom roman clay mix using a base of “Portola Roman Clay” in “Jasper” with a hint of natural ochre pigment.
We followed a three-coat process for extreme depth. The first coat was heavy, the second defined the clouds, and the third was a “skim water” coat—thinned by 10% with distilled water—to polish it to a soft glow. We sealed it with two heavy coats of a matte, food-safe mineral sealant. The result looked like a monolithic stone chimney pulled straight from a Tuscany farmhouse. It cost the client about $400 in materials and two days of my labor, a fraction of a custom quartz slab. That is the power of mastering how to apply roman clay. You aren’t just decorating a wall; you’re mimicking geology.
The Color Gamble: Pigments and Batches
Obsessing over roman clay colors is where I see most people stall. You need to stop looking at digital screens. The texture of roman plaster walls changes the perceived color significantly. A flat color chip looks a shade and a half lighter on the wall because the burnished texture catches light from every angle, diluting the pigment’s darkness. Always buy a sample kit.
Mix your sample thoroughly—the heavy aggregate settles hard. Use a drill mixer. Apply the roman paint sample to a 2×2 foot sheet of drywall that’s been primed exactly like your walls. Let it cure completely (48 hours) and seal half of it. Evaluate the color in morning and evening light. I once chose a gorgeous warm gray that turned into “sickly cadaver purple” under the client’s cool LED kitchen lights. This happens because the natural earth pigments in true roman clay plaster contain complex iron oxides that shift under different color temperatures. If you’re hiring painting and plastering services, ask the contractor to leave you a hardened sample of the mixed batch before they leave. This is your record for future touch-ups.
FAQ Section
What is the difference between Roman clay and Venetian plaster?
Technically, roman clay is often marketed as a specific product line (like Portola’s) that simulates the look of ancient plaster with a slightly more forgiving, grit-free application for DIYers. Traditional Venetian plaster is usually applied with a burnished, high-gloss marble finish, while roman clay wall finishes aim for a matte, soft stone feel.
Can I use roman clay in a shower?
You can use it on the walls of a bathroom, and it handles steam beautifully. However, I never recommend a roman clay wall finish inside a direct, constant water spray zone like a shower enclosure unless it’s sealed with an industrial epoxy sealer, which sort of ruins the breathable nature of the roman clay plaster. The sealing technology struggles to defeat standing water.
How durable are roman clay walls in a high-traffic hallway?
Extremely durable. The lime is naturally antibacterial and hard. The downside of a roman clay wall in a hallway is that the texture is difficult to lean against or brush past with a backpack without leaving a slight waxy burnish mark where oil transfers. Regular spot-sealing handles this, but it’s worth noting that the finish does “record” heavy traffic over years.
How do I clean a finished roman clay wall?
Avoid harsh chemicals. I stick to a damp, soft microfiber cloth. If you’ve sealed your roman clay walls properly, you can gently wipe away dust and minor spills. Never use Magic Erasers; they’re micro-sanders and will strip the burnished surface of your roman clay texture instantly.
Can I apply roman clay over existing paint?
Yes, if you properly prep. You must sand the gloss off the existing paint for plaster walls or old latex. Apply a high-bonding primer specifically made for plaster topcoats. If you trowel roman clay paint onto slick, semi-gloss enamel, it will delaminate and slide right off the wall, usually into a heartbreaking heap on your floor.